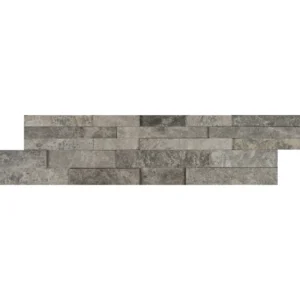
Eterna Bianco 6×24 3D Ledgestone Panel – Chemically Adhesed Grey Marble
Bring architectural texture and timeless elegance to your walls with the Eterna Bianco 6×24 3D Ledgestone Panel. Crafted from fine grey marble, this dynamic stone panel showcases a sophisticated three-dimensional surface that plays with shadow and light. Its chemically adhesed construction ensures a cleaner installation and robust bond for lasting performance.
Designed exclusively for vertical surfaces, this marble ledgestone is ideal for accent walls, fireplace surrounds, and outdoor facades. The honed finish imparts a soft matte texture that elevates both contemporary and classic interiors. Each panel interlocks seamlessly, creating a cohesive and elegant stone facade.
Key Features:
- Material: Premium grey marble
- Finish: Sandblasted
- Panel Size: 6″x24″
- Installation: Chemically adhesed (no mesh backing)
- Application: Vertical wall use only (interior and exterior)
Recommended Uses:
- Fireplace surrounds
- Interior feature walls
- Outdoor facades
- Lobby and reception areas
- Kitchen backsplashes
Enhance your design vision with the sleek, architectural style of Eterna Bianco—where form, function, and natural beauty unite.
Installation Guide – Eterna Bianco 6×24 3D LedgeStone Panel (Wall Use Only)
Step 1: Surface Preparation
- Confirm that the wall surface is clean, level, and structurally sound.
- Acceptable substrates include cement board, masonry block, or concrete.
- Install a moisture barrier or waterproof membrane in wet areas.
- Do not install directly onto drywall. Use metal lath and scratch coat if necessary.
Step 2: Layout & Orientation
- This panel is designed for vertical wall installations only.
- Dry-lay multiple pieces before installation to achieve desired shading and pattern balance.
- Stagger panel joints to maintain a natural appearance.
- Mark horizontal reference lines using a level to ensure straight alignment.
Step 3: Adhesive Application
Recommended Mortars:
- Laticrete MVIS Hi-Bond
- Mapei Ultraflex LFT or equivalent high-performance thin-set mortar
Instructions:
- Apply mortar with a 1/2″ square-notched trowel on the substrate.
- Back-butter each panel to ensure full coverage and optimal bonding.
- Press firmly into place with a sliding motion, starting from the bottom and working upward.
- Use a level frequently to maintain accuracy.
Step 4: Cutting & Fitting
- Use a wet saw with a continuous-rim diamond blade for clean cuts.
- Miter panel ends for clean external corners or use dedicated corner pieces if available.
- Always wear protective eyewear and gloves during cutting.
Step 5: Finishing
- This is a dry-stack system – no grout is required between panels.
- Wipe off any excess mortar from the surface immediately.
- Allow panels to cure undisturbed for 24–48 hours before exposure to moisture or weight.
Step 6: Sealing (Optional but Recommended)
- Apply a penetrating, breathable sealer suitable for natural stone to enhance protection.
- Reapply sealing every 1–2 years depending on exposure conditions.
Maintenance Tips
- Use pH-neutral stone cleaner and a soft brush for cleaning.
- Avoid acidic or abrasive products that may damage the finish.
Disclaimer
This product is intended for vertical wall use only. It is not suitable for flooring or load-bearing applications. Natural color variation and textural differences are to be expected and celebrated. Always inspect and dry-lay product prior to installation. Stonemarket USA is not liable for installation errors, structural issues, or improper use. Professional installation is highly recommended.