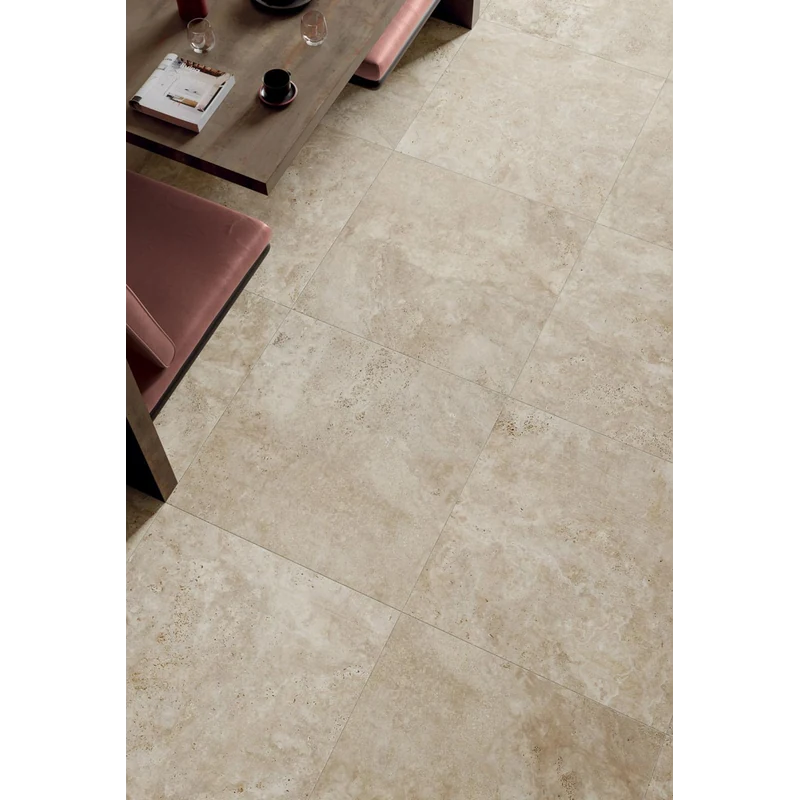
Happy Floors Navona Honey Cross Cut Brick Rectified 4×12 Porcelain Tile
The Happy Floors Navona Honey Cross Cut 4×12 Porcelain Tile brings warm honey tones and the distinctive visual character of cross-cut stone to residential and commercial design schemes. Its natural finish and brick-format proportions create a refined foundation for floors, walls, backsplashes, and decorative layouts.
Made from durable porcelain and finished with rectified edges, this 4×12 tile supports clean, carefully aligned installations. The Navona collection offers a versatile neutral palette that can complement contemporary, transitional, and classic interiors, while its frost-free designation may support exterior applications when the complete installation system and local conditions are properly verified.
The 4×12 format can be arranged in traditional brick patterns, stacked layouts, borders, and other design configurations. Because tile appearance can vary by production and box, review and blend material before installation for a balanced finished result.
Features
- Material: Porcelain
- Collection: Navona
- Color: Honey Cross Cut
- Finish: Natural
- Size: 4×12 inches
- Thickness: 5/16 inch (8.5 mm)
- Edge: Rectified
- PEI rating: 4
- DCOF: 0.6
- Frost-free: Yes
- Coverage: 0.305 sq. ft. per piece
- Pieces per box: 30
- Coverage per box: 9.15 sq. ft.
Recommended Applications
- Interior floors
- Interior walls
- Kitchen backsplashes
- Bathroom walls
- Decorative accent areas
- Exterior applications where the product, substrate, drainage, climate, and installation system are verified as suitable
Installation Guide – Happy Floors Navona Honey Cross Cut Brick Rectified 4×12 Porcelain Tile
Important Advisory
Inspect all tile before installation to confirm color, shade, size, finish, and quality. Plan the layout and installation according to Happy Floors instructions, applicable local building codes, and recognized tile-industry standards. Verify that the selected substrate, mortar, grout, waterproofing, drainage, and movement-joint systems are appropriate for the intended application.
Step 1: Layout & Planning
- Confirm the measured area, installation direction, and starting reference lines before setting tile.
- Dry-lay material from multiple boxes to review the Honey Cross Cut color and natural surface appearance. Blend tiles during installation for a balanced result.
- Plan cuts so narrow slivers are minimized and finished edges are positioned in less prominent areas where possible.
- The 4×12 format can be used in running-bond, stacked, border, and other layouts. Establish the pattern before applying mortar and maintain the planned orientation throughout the installation.
Step 2: Tile Installation
- Prepare a clean, dry, flat, stable, and structurally sound substrate that is suitable for porcelain tile. Correct cracks, low areas, contamination, or other conditions that may affect bonding before installation.
- Use a quality mortar suitable for porcelain tile, the substrate, and the specific installation environment. Follow the mortar manufacturer’s instructions for mixing, application, open time, and curing.
- Apply mortar consistently with an appropriate trowel selected according to substrate conditions, tile format, and manufacturer guidance. Press tiles firmly into the mortar and periodically check the back of a lifted tile to confirm satisfactory contact and coverage.
- Use spacers or an approved layout system as needed to maintain consistent joints and alignment. Rectified edges require careful installation and should be handled in accordance with tile-industry recommendations.
- Provide movement accommodation at changes in plane, perimeter conditions, and other locations required by applicable standards and the installation system. In wet areas, coordinate the tile installation with a suitable waterproofing system.
Step 3: Cutting
- Measure and dry-fit each cut before applying mortar.
- Use a professional wet saw or tile cutter with equipment appropriate for porcelain tile. Use suitable tools for openings around outlets, plumbing, and other penetrations.
- Handle cut pieces carefully and protect finished surfaces during cutting and placement. Smooth or finish exposed cut edges when the design requires it.
Step 4: Joint Filling
- Allow the mortar to cure according to the mortar manufacturer’s instructions before grouting.
- Select a grout compatible with porcelain tile, the planned joint width, and the installation environment. Apply and remove grout according to the grout manufacturer’s directions.
- Clean excess grout from the tile surface before it hardens, using clean water and methods appropriate for the natural finish. Use flexible sealant rather than rigid grout where required at changes of plane and movement joints.
Step 5: Cleaning & Maintenance
- Remove mortar, grout residue, and construction debris using products and methods approved for porcelain tile and the grout system.
- Clean regularly with a mild, non-abrasive cleaner and a soft cloth, mop, or approved pad.
- Avoid harsh chemicals, abrasive tools, and cleaning methods that may damage the finish or grout joints.
- Maintain grout and movement joints according to the grout and sealant manufacturers’ care recommendations.
Disclaimer
Installation guidance is general and does not replace the product manufacturer’s instructions, project-specific specifications, local codes, or professional installation advice. Stone Market USA is not responsible for installation errors or for material installed without prior inspection and approval.