Loading... (Warehouse Local Time)
Mon–Fri: 9:00 AM – 6:00 PM |

Pearl Black Marble Mosaic Tile – Pixel Honed

Pearl Black Marble Mosaic Tile – Pixel Honed features dark marble in a bold pixel layout. Its honed finish adds a soft matte touch, perfect for backsplashes, bathrooms, and accent walls.

$17.99 / Piece

Item Code: MM132-24139 Category

540 Pieces in stock

Est. Coverage: 0.86 sq. ft. per piece   |   8.60 sq. ft. per box   |   464 sq. ft. per crate   |  Request Info
Note on Samples:
Sample pieces are small cut sizes, approximately 3" x 3" to 8" x 8", and intended for color and finish reference only.
If you need a full-size sample, please contact us.

Request Custom Pricing for Large Orders

Planning a large project? Orders over 500 sq. ft., full crates, or commercial applications may qualify for exclusive volume pricing. Reach out today and let us provide a custom quote tailored to your needs.

Request Volume Quote
  • Volume pricing available for qualified bulk orders.
  • We offer custom sizes, finishes, and crate-based shipments.

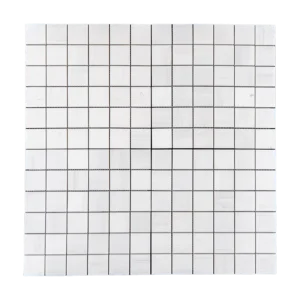
Pearl Black Marble Mosaic Tile – Pixel Honed is a striking choice for modern interiors. Crafted from premium black marble, this mosaic highlights natural depth with subtle variations in tone. The honed finish softens the surface, giving it a smooth, matte appearance that enhances both contemporary and classic spaces.

The pixel pattern creates a bold geometric effect. Because of its uniform grid, it works beautifully as an accent wall, backsplash, or decorative floor insert. Moreover, the dark tones provide contrast when paired with lighter marbles or neutral finishes. As a result, it becomes a versatile material for designers seeking both elegance and statement style.

Since it is made from durable marble, this tile ensures long-lasting beauty and performance. Whether used in residential or commercial spaces, it delivers strength and timeless appeal. Therefore, it is an excellent solution for homeowners and professionals aiming for luxury with a modern edge.

Key Features

  • Premium black marble with rich, natural depth
  • Honed finish for a soft, matte look
  • Pixel pattern with clean geometric lines
  • Durable and long-lasting natural stone
  • Ideal for modern and bold interior designs

Applications

  • Kitchen backsplashes with dramatic effect
  • Bathroom and shower feature walls
  • Accent borders or statement strips
  • Commercial spaces with contemporary flair
Weight4 lbs
Dimensions10.4 × 12 × 0.40 in
Color

Finish

Thickness

Size (inches)

Design

Pixel

Material

Usage Area

Backsplash, Commercial Interior Walls, Outdoor Walls, Residential Interior Walls, Shower Walls

Installation Guide – Carrara White Pixel Honed Mosaic Tile (Marble)

Material Notes

  • Natural Carrara White marble with a honed (matte) finish.
  • Square “pixel” chips (typically 3/8″–1″) mesh-mounted on ~12″x12″ sheets (some lots may be paper-faced).
  • Ideal for walls, backsplashes, shower floors, and light-traffic residential floors. Numerous grout joints add traction.

Step 1: Surface Preparation

  • Substrate must be clean, dry, and very flat (≤1/8″ in 10′; ≤1/16″ preferred for mosaics). Patch/skim as needed.
  • Approved substrates: cement backer board, properly cured concrete, or mortar bed.
  • Wet areas: install ANSI A118.10 waterproofing; shower floors require ¼” per foot slope to drain.
  • Use only white setting materials under light marble to prevent shadowing/picture framing.

Step 2: Dry Layout & Sheet Planning

  • Blend sheets from multiple boxes to distribute natural shade/vein variation.
  • Snap level reference lines; confirm “grain”/orientation (arrows on backs when present).
  • Trim mesh edges and stagger sheet seams so the sheet grid disappears. Test-fit around outlets and edges.

Step 3: Adhesive (Thin-Set) Application

Use:

  • White, polymer-modified thin-set rated for natural stone (ANSI A118.4/A118.15). Avoid premixed mastic, especially in wet areas.

Trowel & Technique:

  • 3/16″ V-notch (or 1/4″x3/16″ V-notch) on flat substrates.
  • Key in with the flat side, then comb in one direction and lightly flatten ridges so they don’t telegraph through small chips.
  • Work in areas you can cover within 10–15 minutes to avoid skinning.

Step 4: Setting the Mosaics

  • Place sheets along layout lines; press with a rubber grout float or beating block for full contact and a flat plane.
  • Check for squeeze-through; clean thin-set from joints and faces immediately with a damp sponge.
  • Lift and reset if lippage occurs; back-butter individual chips where needed to maintain plane.
  • If paper-faced: set paper out, beat in, dampen paper after initial grab (≈10–20 min), remove paper, then true up joints.

Step 5: Cutting & Detailing

  • Use a wet saw with a continuous-rim diamond blade rated for marble; tape the cut line to minimize chip-out.
  • For tiny trims, use mosaic nippers sparingly; dress exposed cuts with a rubbing stone.
  • Finish exposed edges with stone trim, metal profiles, or matching moldings.

Step 6: Grouting (Honed Marble)

  • Allow thin-set to cure (typically 24 hours).
  • For joints ≤1/8″, use unsanded grout to protect the stone; for slightly wider joints, use a fine-aggregate, marble-safe grout (test first).
  • Optional: apply a marble-safe grout release or pre-seal the stone to reduce pigment uptake.
  • Pack diagonally with a rubber float; clean with minimal water to avoid washout or shading.

Step 7: Sealing

  • After grout cures (typically 72 hours), apply a penetrating, breathable sealer approved for marble and grout.
  • Re-seal periodically based on use and exposure (e.g., every 1–2 years in wet zones).

Maintenance

  • Use pH-neutral, non-abrasive stone cleaners only; avoid acids, vinegar, bleach, or abrasive pads.
  • In showers, squeegee/wipe dry to minimize mineral deposits; use marble-safe scale removers if needed.

Movement Joints

  • Provide soft joints per TCNA EJ171 at perimeters, changes of plane, and over structural joints.
  • Use 100% silicone (stone-safe) in corners and where tile meets dissimilar materials.

Important Notes & Disclaimer

  • Natural marble varies in tone and veining; dry-lay and blend sheets before setting.
  • Always use white thin-set under light Carrara; avoid gray or dark adhesives.
  • Stonemarket USA is not responsible for substrate issues or improper installation. Professional installation is recommended.

Category
Category
Material
Material
Color
Color
Size
Size
Finish
Finish
Design
Design
Thickness
Thickness
Application
Usage Area
Request a Quote
Tell us briefly about your project, sq ft, and timing.